One of the most common questions from budding entrepreneurs and digital marketers is: How do I set up a fanpage? Web users are often looking for a step-by-step guide that explains how to set up their first Facebook business page. In this article, we will show you how to set up a Facebook fanpage step by step.
What is a Facebook fanpage?
But one step at a time, because not everyone knows what a Facebook fanpage even is. A fanpage is a company page on what is currently the most popular social media platform in the world. Setting up a fanpage (company page) is simple and opens up many new options for every entrepreneur. As a fanpage administrator, you have the opportunity to publish content under your company’s banner, you can monitor advanced statistics about your audiences and you can launch your first Facebook Ads campaign.
You can read more about Facebook pages, events or groups in the Meta’s official documentation.
How do I set up a fanpage on Facebook?
Setting up a fanpage, company profile or artist profile is very easy! The only requirement is that you have a personal Facebook account. If you do not already have one, do not hesitate to set one up on the social network’s homepage.

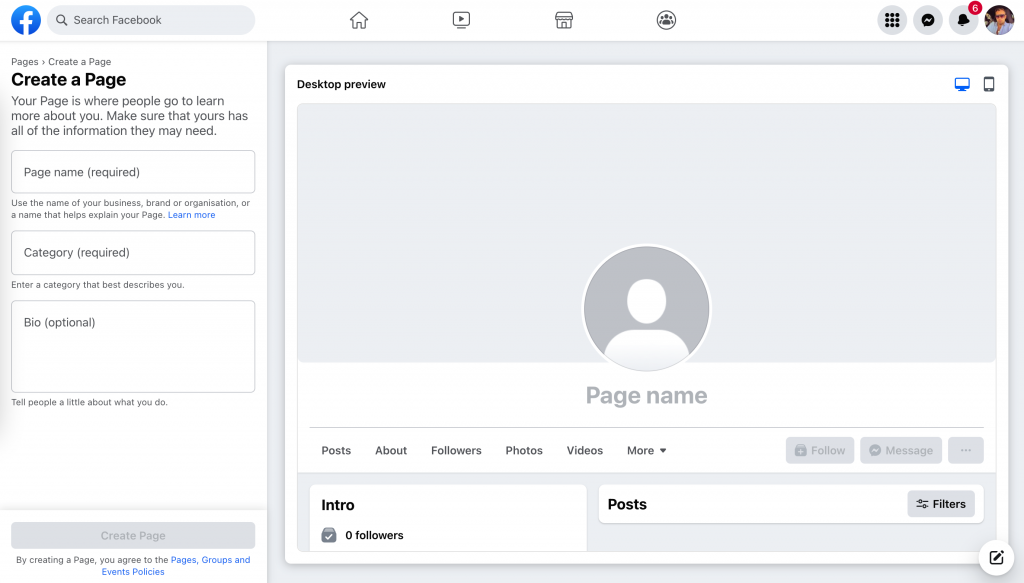
If, on the other hand, you are currently logged into your personal account, then simply click on this link and set up your fanpage. To your eyes you will see the panel for creating a company page, it should look like this:

Whichever option you choose, however, you will need to link your new fanpage to your personal account. This is the step required to create a new page, whether you are creating a corporate profile or a specific community.
Complete the fanpage data
In the next section, we will have to decide whether the page we are creating is to be a fanpage of a company, an artist, or perhaps to represent a community or a product? The choice is large and this is, in spite of appearances, an important moment, because each type of fanpage is characterised by other available options and, above all, your page will be recommended to users expressing interest in topics related to your page.
In the next step, you will need to choose a name for your fanpage. Again, this is an important moment, because the name of the page should clearly indicate what your company does. For example, the name ‘Jakub Papuga’ itself may not say much to Facebook users, but the name ‘Jakub Papuga – Marketing for e-commerce’ already clearly indicates what content can be found on the profile. Which fanpage name should I choose? Choose the name of your company and a short description of your business profile.
Further on, all you need to do is fill in the basic information about the site, such as description, opening hours, web address, location and contact details.
What else? Be sure to complete your profile picture and background photo. The fanpage is your business card and needs to look professional and friendly right from the start. What size should your social media graphics be? I wrote about this some time ago on my blog. It is well worth a visit.

The final touch – setting up your target group
In the last section, we are tasked with choosing which audience you want to reach by publishing content on your newly created company website. You can choose options such as location, age, gender or interests. At this stage, you can create exclusions if you want to narrow the audience to a more specific group.
This is an introduction to Facebook ad targeting. You will find many more options in the Facebook Ads Manager. If you are interested in promoting your business online, this is a good time to refer you to the article How to effectively promote your brand with a limited marketing budget.
That’s it! You have just created your first Facebook fanpage! Congratulations! What’s next? Start posting, regularly and interestingly 🙂
Oh, and remember that all the settings you have set – can be edited in the Site Settings.


